
| Rye %: | 100% |
| Stages: | Stage 1 sponge, Stage 2 sponge, Final dough |
| Leaven: | Rye sour culture |
| Start to Finish: | 14-16 hours |
| Hands-on Time: | 25-30 minutes |
| Yield: | Two 1¾ lb/800 g loaves |
A couple of months ago, I posted a recipe for this Auvergne classic that used both a rye sour sponge and a yeasted rye sponge. Then I came across a video from the École internationale de boulangerie for this same bread, but built on a sour sponge only. Of course, me being me, I had to bake it as well – both for my own curiosity and also because I was teaching a rye baking workshop for the Bread Bakers Guild of America and needed about 2 lb/900g of stale rye bread, which I didn’t have on hand. This bread, being 100% rye and devoid of flavoring agents outside of salt, was the perfect candidate for staling (with enough left over for comparison tasting with my earlier loaf).
Except for the use of yeast in the first recipe, both breads are strikingly similar. Both breads contain 100% rye and both preferment 42% of total flour. Two points of difference are that the yeast version is hydrated at about 80% and contains 2% salt, while this version is hydrated at 91% and contains just over 1% salt.
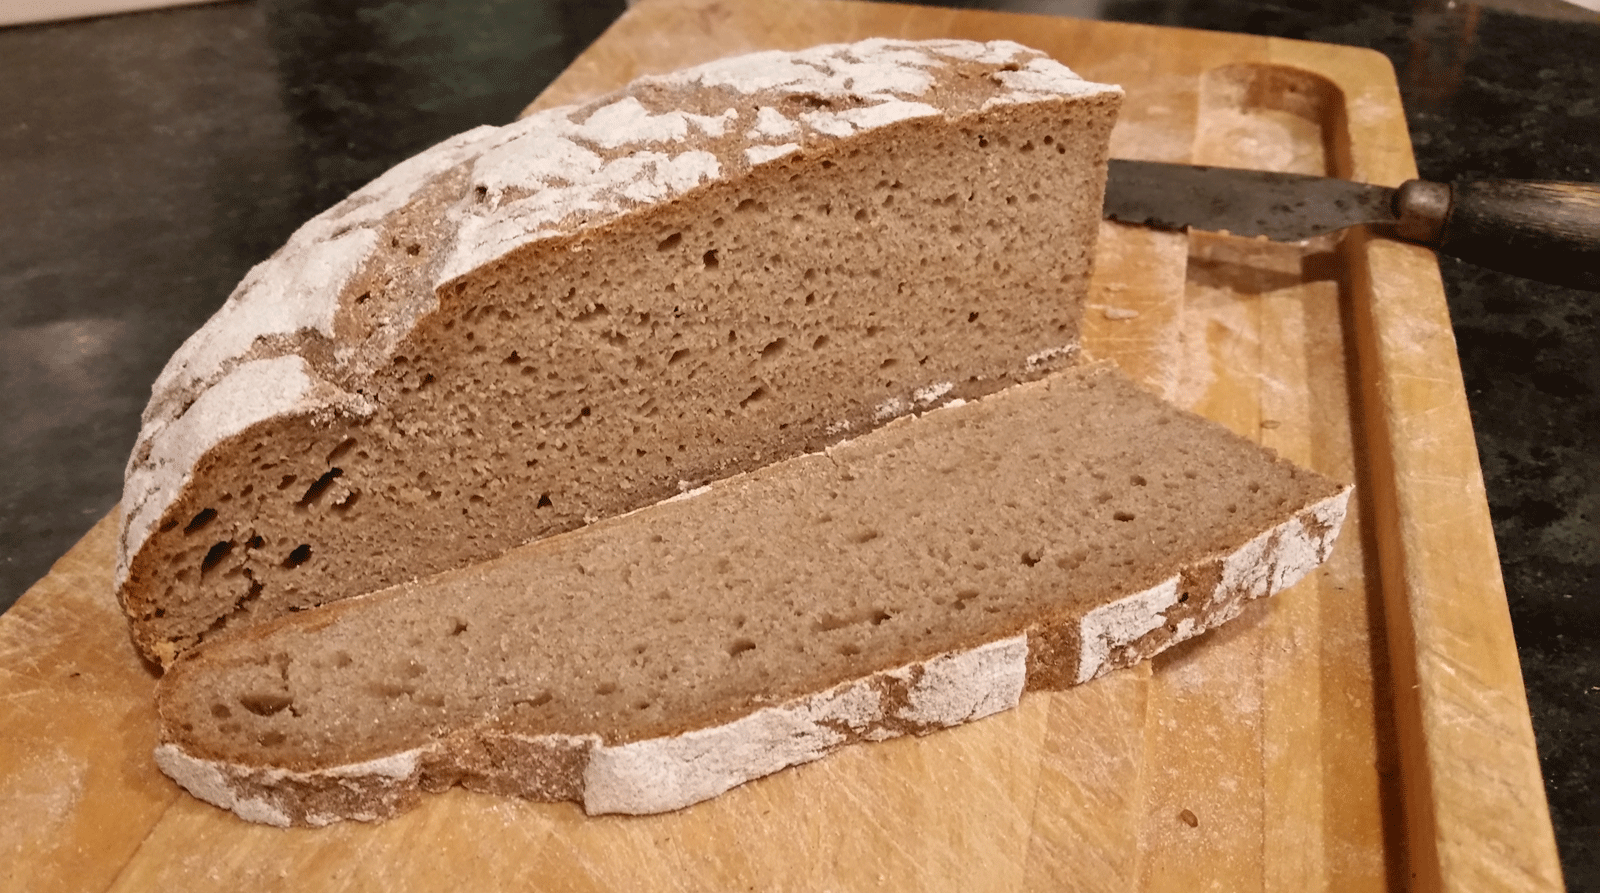
Despite their similarities, the finished loaves were very different. For one thing, the crumb on this bread was far more open, owing, I think, to the higher hydration, and making for a much more pleasant chew. And while both loaves showcased the sweet-nutty flavor of the rye, I found this version’s more assertive sour finish – understandable, considering the two-stage sour sponge – much more to my taste.
I think if there’s a lesson to be learned, it’s that each of the world’s rye breads isn’t a single, carved-in-stone entity, but a constantly evolving embodiment of the culture and conditions of its birthplace. I’ve seen hundreds of rye bread recipes from all across Europe and America, each different, each with its own unique characteristics, and all worthy of baking and enjoying.
Stage 1 sponge (Day 1, Evening):
| Ingredient | Grams | Ounces | Baker’s Percentage |
| Wholegrain rye flour | 118 | 4.15 | 100% |
| Warm (105°F/41°C) water | 118 | 4.15 | 100% |
| Rye sour culture | 14 | 0.50 | 12% |
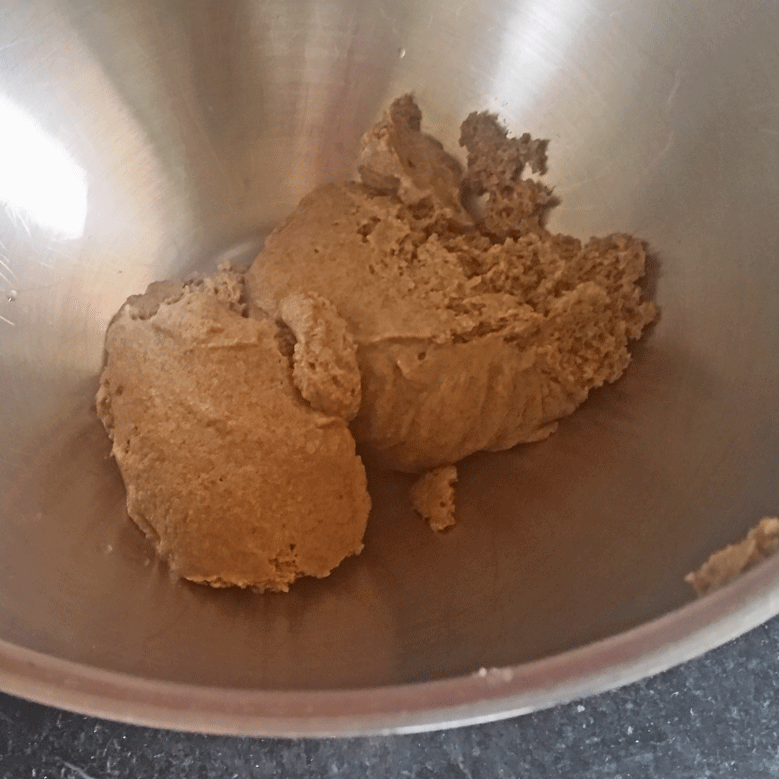 Mix the sponge ingredients by hand, cover and ferment at room temperature (70°F/21°C) overnight, 10-12 hours. The sponge will have tripled in volume and be very bubbly.
Stage 2 sponge (Day 2, Morning):
| Ingredient | Grams | Ounces | Baker’s Percentage |
| Stage 1 sponge | 250 | 8.80 | 100% |
| Wholegrain rye flour | 250 | 8.80 | 100% |
| Warm (105°F/41°C) water | 250 | 8.80 | 100% |
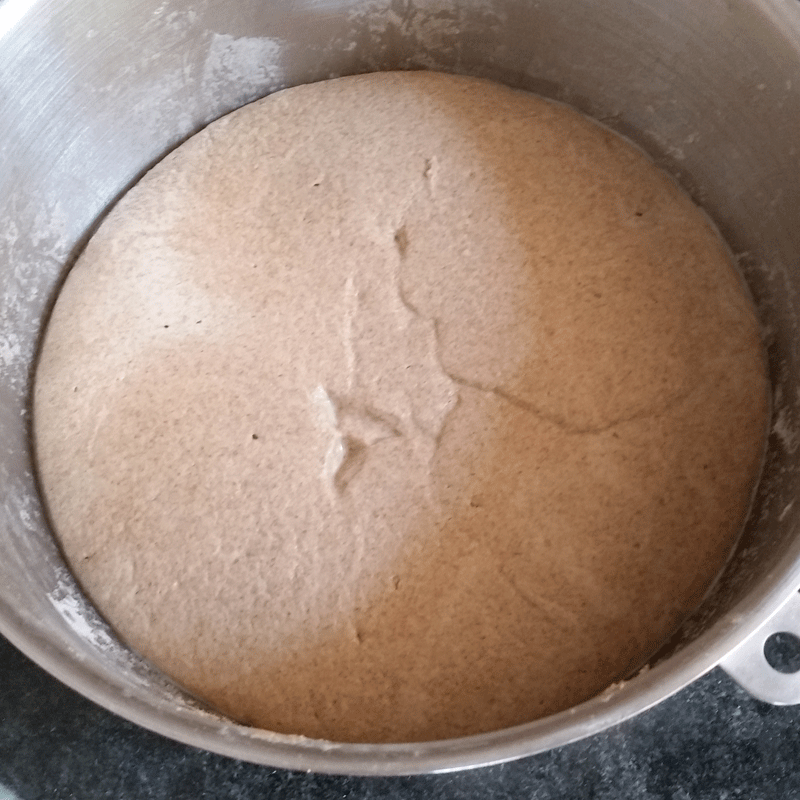
 Combine the Stage 1 sponge and the Stage 2 ingredients in the mixer bowl, cover and ferment at room temperature until the dough has visibly expanded and shows cracks or broken bubbles, 1½-2 hours.
Final Dough (Day 2, Midday):
| Ingredient | Grams | Ounces |
| Stage 2 sponge | 750 | 26.40 |
| Wholegrain rye flour | 500 | 17.65 |
| Warm (105°F/41°C) water | 425 | 15.00 |
| Salt | 10 | 0.35 |
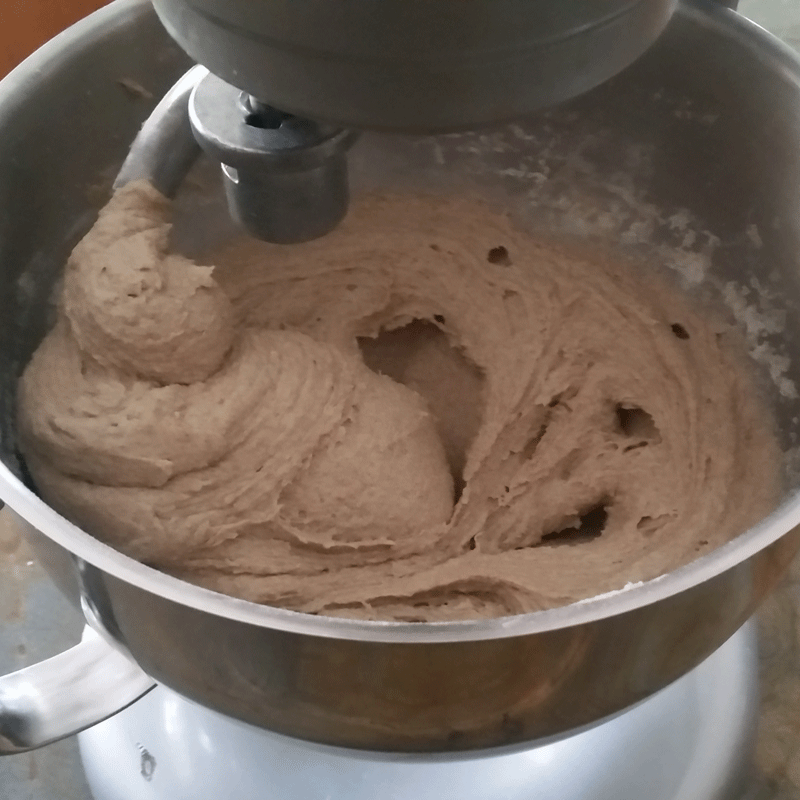 In the mixer bowl, combine the final dough ingredients and use the dough hook at low (KA2) speed to mix until fully blended into a soft, sticky dough that gathers around the hook but doesn’t leave the sides of the bowl, 5-6 minutes.
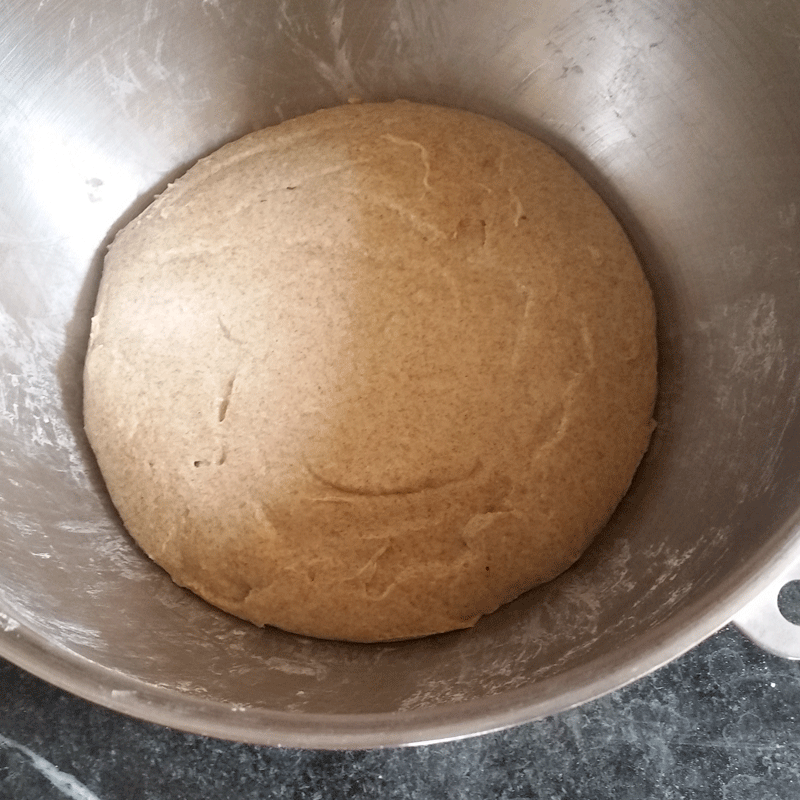
 Cover the bowl and ferment at room temperature until the dough doubles in volume and shows cracks or broken bubbles, 1½-2 hours.
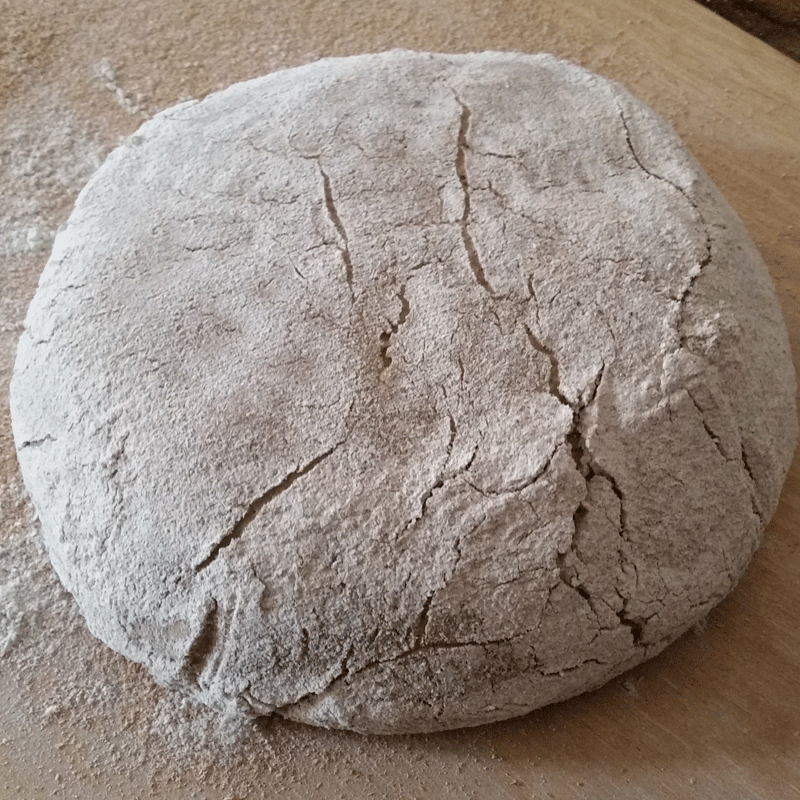
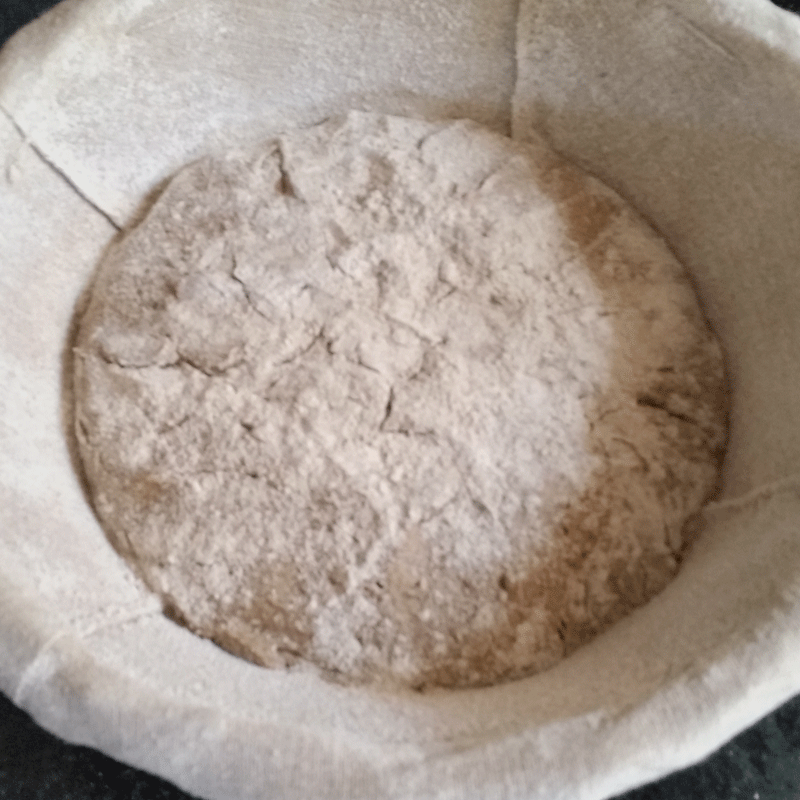 Turn the dough onto a well-floured work surface and divide into two pieces, each weighing about 1 ¾ lb/800g. Use floured hands to gently shape each into a boule, then place each boule seam side up in a floured linen-lined banneton or cloth-lined proofing basket. Cover and proof at room temperature until the dough has visibly expanded and shows cracks or broken bubbles, 20-30 minutes.
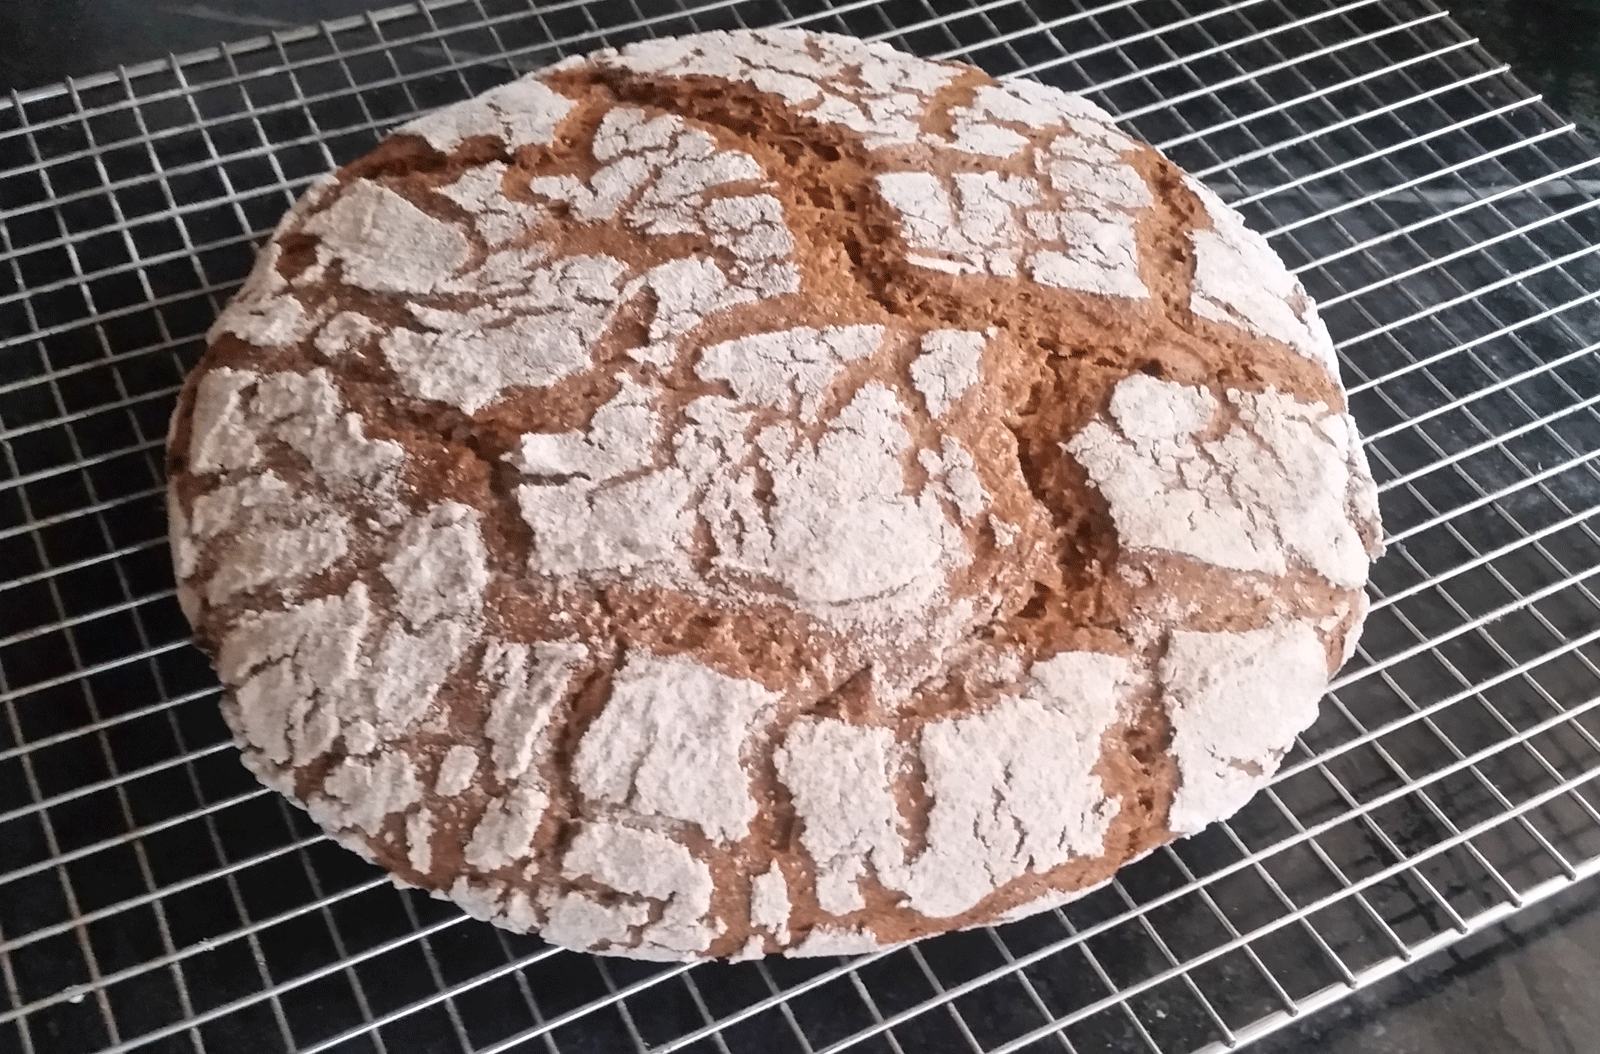
 Preheat the oven to 445°F/230°C with the baking surface in the middle. Turn the loaf onto a well-floured peel, if using a baking stone, or a parchment-lined sheet pan.
Bake without steam for 15 minutes, then lower the temperature to 430°F/220°C and bake for an additional 15 minutes. Reduce the temperature again to 390°F/200°C and bake until the loaves thump when tapped with a finger and the internal temperature is at least 200°F/93°C, 30-40 minutes. Transfer to a rack and cool thoroughly before slicing.
Bakers Percentages:
| Ingredient | g | % |
| Whole rye flour | 868 | 100.00% |
| Water | 793 | 91.35% |
| Salt | 10 | 1.15% |
| Rye sour culture | 14 | 1.61% |
| TOTAL FORMULA | 1,685 | 194.24% |
| Prefermented | 368 | 42.36% |
David M Snyder
March 22, 2017Hi, Stan. This looks good, and I am going to try it. Please verify: “Bake without steam…” Or is this a typo?
BTW, I have just gotten around to reading your book . You know, it’s really good!
Best regards,
David
Stanley Ginsberg
March 22, 2017I baked without steam and the loaves came out extremely well. I think that the shortness of the proof, only 15-20 minutes, allows the crust to maintain flexibility during the spring. Glad you like the book!!
David M Snyder
March 22, 2017Thanks for your speedy reply. David
Danielle
March 23, 2017Really enjoyed the comparison of the two loves, thank you
Florin Brutărescu
March 24, 2017If we would ferment for 20-30 minutes and proof for 1.5-2hrs, could we get a greater volume of the bread ?
Stanley Ginsberg
March 24, 2017Probably not. If anything, the bread would most likely decrease in volume and become gummy because of overfermentation, which runs the risk of excessive starch degradation. For a detailed explanation of starch degradation, see my book, The Rye Baker, pages 47-48.
Florin Brutărescu
April 20, 2017Well, I did open the book at page 47-48 (it arrived 2 weeks ago :), but still not convinced. The reason I am asking is because Apieceofbread (Ian Lowe) had a 100% rye recipe on his IG that required a very short bulk (20min) followed by a 3h proof (recipe is here: https://www.instagram.com/p/z3TojVGBoq/)
Stanley Ginsberg
April 20, 2017In fact, bulk fermentation/proof times can vary considerably. As I note elsewhere in the book, “… rye doughs, especially those with a large sour sponge component, are really pretty time tolerant, with average bulk fermentation times of 1 hour or longer — a few fermenting for as long as 5 or 6 hours.” (p 61)
“On average, rye breads proof for about 45 minutes, but as with bulk fermentation, proofing times can vary considerably, depending on the composition of the dough and the bulk fermentation time. Ammerland Black Bread, for example, proofs for 2½–3 hours, but that’s because it goes directly from mixer to pan, with no bulk fermentation. Zakopane Buttermilk Rye, on the other hand, proofs for 1–1½ hours after fermenting for just 20–30 minutes. And Galician Rye, which ferments for 2–2½ hours, proofs for less than 10 minutes. (p 63) … “
Susan San Martin
March 24, 2017Hello,
I baked this bread this afternoon. The flavor is very pure as you said, and the salt level is perfect for me. I used Hodgson Mills whole rye flour. I just read the preceding comment about gumminess resulting from overfermentation, and that may be a clue explaining the result I got. I let the loaf go for an extra 20 minutes over your time for the proof. I baked it and checked the internal temp with a Thermapen at 25 minutes after I lowered the temperature for the last time. It read 218 so I pulled the loaves. I let them cool thoroughly and they were maybe a 3 out of 10 on the gumminess scale. Do you think that 20 minutes of extra fermentation could be the culprit? The other question I have is about the meaning of “room temperature.” I now use a folding electric bread proofer and can set temps digitally. This beats the heck out of other options in our house. I let the bread go another 20 minutes because it seemed like it hadn’t risen very much…..and I thought that maybe the room was too cool.
Stanley Ginsberg
March 25, 2017Overproofing and underbaking are generally the two major culprits in gummy loaves, and I suspect the extra fermentation time was the cause in this case. When I specify room temperature, I mean 70-72F (21-22C).
Rye breads often don’t expand much during proofing, especially when the proofing is of short duration, as in this bread. Rather, the crumb gets its structure from both the bulk fermentation and oven spring.
You may also want to let the loaves season for a day or two; often, that will redistribute moisture from the center to the crust and reduce the gumminess.
Susan San Martin
March 26, 2017I just sampled the bread this morning and it is indeed less gummy! Thank you for your bread detective work, Stanley, I will try this loaf again with my proofer at “room temperature” and my timer on a lanyard ’round my neck…..I will let not my eyes deceive me with my wheat baker’s assumptions about rise!
Dean
March 26, 2017Hello Stanley,
Lately I’ve been using the Detmold 3-stage process for my rye bread, the dough being baked in Pullman pans. It comes out much darker than your bread shown here. The fermentation steps are longer, especially stage II. Could that be the reason? Also, I mill all of the whole grain myself. Thanks.
Stanley Ginsberg
March 26, 2017The ripening of the sour shouldn’t affect the color, but the fermentation likely does, since the amylases have more time to break the starches into sugars, resulting in a greater degree of caramelization.
Joy
March 26, 2017Hello Stanley,
Can I bake these in a tin and does the initial 14 g sour culture need to be active or can it come straight out of the refrigerator?
Thanks
Stanley Ginsberg
March 26, 2017Yes, you can pan them; you’d just need to pay attention to internal temperature. Also, you can use the culture right out of the fridge, as long as it hasn’t gone more than 24 hours since its last feeding.
Joy
March 26, 2017Okay, cool. Will try it. Is the internal temp same as for regular bread? 98 – 98 c?
Stanley Ginsberg
March 26, 2017Yes.
Mark Woodward
March 28, 2017Hi Stan,
I’m looking forward to trying this. I just watched the video and noticed that you are doing some things rather differently. First of all, you are fermenting at room temperature when the video calls for maintaining a target dough temperature of between 86°F and 95°F (30°C-35°C) and fermenting at 95°F. Second, you are gently shaping the boules before putting them in the bannetons, whereas the video calls for gently scooping the dough into the bannetons without any shaping so as to avoid any degassing. And finally, you are baking without steam when the video calls for initial steam. I am just wondering why you have made these changes. Also, the video puts great emphasis on measuring and controlling the PH, which you don’t mention (perhaps not a bad thing since I don’t have anything with which to measure the PH!). I’ll look forward to your response. Many thanks and all the best,
Mark
P.S. I also love the book – this is the book I wanted when I started baking a few years ago but it didn’t exist then. : )
Stanley Ginsberg
March 30, 2017Yes, I tweaked the recipe in order to make it more accessible to most home bakers, who (a) don’t generally have the capability to ferment/proof doughs at temperatures much above room temperature, and (b) don’t normally have pH readers in their kitchens. My approach is much more seat-of-the-pants, if you will: the pre-Industrial bakers who produced these breads did so without benefit of modern science or technology, the whole purpose of which, at least in baking, IMO, is to produce products with consistent taste, texture and appearance. Ergo, I dispensed with the stuff that I thought would be beyond most home bakers (but included the link to the video for those interested in going directly to the source).
As for the steam, I decided to bake dry to see what happened and was very satisfied with the result, so I think it’s safe to say that steam is optional for this one.
Stephanie
March 28, 2017Hello,
I have a question that might sound stupid to experts, but as I am a beginner I need to ask: Do you have a recipe on how to make the rye sour culture that is needed for many breads?
Thanks in advance:)
Stanley Ginsberg
March 30, 2017There are literally dozens of ways to start a sourdough culture, and you might try googling “sourdough” or do a search on thefreshloaf.com. I give instructions in The Rye Baker as well. Also, I recently discovered that the easiest way to start a culture is to mix equal weights of organic whole rye flour and water, place the mixture in a covered container and let it rest for 3-4 days, after which time it should be bubbly and visibly expanded. Remove 3/4 of the culture and feed the rest with equal weights of flour and water, then let it rest for a day. Repeat this daily for a week and your culture will be ready to use.
Susan San Martin
April 1, 2017Hello Stanley,
I tried this recipe again yesterday, this time paying careful attention to the times in your recipe and using my proofing box set at 72. I baked them with the stepped down temps as described in your recipe, and the final leg of the bake I left the loaves in for 30 min. Once fully cooled, still gummy, but maybe a 2.5 on a scale of 10. So, less gummy than before. Any thoughts? I wonder if the Hodgson Mills whole rye is relevant?
Dean
April 20, 2017Hi Susan,
As has been suggested, you may want to wait two full days before slicing. It can take a while for the startches to fully gelatinize. When I wait two days, I’ve never had a problem with gumminess. Also, I always use 100% whole grain rye…never sifted. In fact, I’ve found that the coarser grinds work better than finer grinds. Good luck!
Mark Woodward
April 2, 2017I baked this a few days ago, but waited until yesterday to taste it. My rye sour culture (AKA sourdough starter made with some leftover pumpernickel flour) came straight from the fridge and hadn’t been refreshed for some two weeks (I just moved). I milled my own flour, sifting and remilling the stuff remaining in the sifter twice to get finer flour (after the third pass through the mill I just included the remaining larger bits of bran and germ). I fermented at 95°F/35°C as called for in the video. At both stages I let the fermentation continue for two hours because after 1.5 hours the dough didn’t look fermented enough. I simply scooped the dough into the bannetons as in the video (the dough was so wet it would have been nearly impossible to shape). And I am very pleased with the results. The loaves look like those both in the video and in the recipe above. The crumb is relatively open (for a 100% whole grain bread) and the rye and sour flavors are assertive. It is not gummy (no doubt thanks to waiting two days before cutting the bread). In short, I am very pleased with the outcome. Cheers, Mark
: )
Susan San Martin
April 2, 2017Hi Mark,
Where did you get your rye grain?
Mark Woodward
April 2, 2017Hi Susan,
I get the rye berries at my local organic store. In my case this is MOM’s Organic Market. I think I’ve seen them at Whole Foods too. Cheers,
Mark
Susan San Martin
April 2, 2017Thanks! I’ll try the triple-mill sifting — you have good control over particle size with your technique.
Molly Johnson
May 22, 2017I’m an experienced wheat baker and chose this particular recipe for my first all-rye loaf because it is straightforward and I wanted to use 100% wild-captured yeast. I followed all the directions precisely, including making my own rye sourdough starter (from the comments) and used the flour from your store. It has been a delicious, long-keeping, delicately crumbed bread that my family all enjoyed. My boule turned out nearly exactly like the one shown in the video! I also made one parchment-lined glass loaf pan for a square sandwich bread (this needed slightly less baking time) and halfway through the bake threw in one test case of a dinner roll. The roll had a nice chewy crust and was ready to eat right away. I cooled the boule for one day, the sandwich loaf for two. I slightly prefer the boule style but the square loaf was also very good and stayed moist several days.
I do wish the recipe had indicated how wet the dough would be (as one other commenter noted). I think scooping it into the banneton with a dough scraper would have been far more successful than my attempt to shape it on a floured counter with floured hands. Anyway, thanks for posting the video and your recipe. I will definitely be buying your book!
Michael Hacker
December 30, 2017Hello Stanley – I have been searching for a 100% rye boule, and this fit the bill – followed recipe, fermented mixtures in a proofer set at 73 degrees, and both loaves came out looking and tasting good – except that the mixtures didn’t rise nearly as much as yours, and the flavor was a little “flat”, not sour enough for my taste – I used 100% rye flour from Grist & Toll in Pasadena, CA. Any thoughts? Thank you –
Stanley Ginsberg
December 30, 2017I know Grist & Toll well, and love Nan’s flours. That said, stone-ground flours like hers tend to produce denser loaves than roller-milled flours, which generally have a finer texture — which may account for the lesser rise. As for the souring, I think the same problem holds: finer milling creates greater surface area, which means that starch > sugar and sugar > acid conversion occur more quickly than with coarser grinds.
Michael Hacker
December 30, 2017Thanks for the response, and it makes sense – I will search for a coarser flour, unless you have a suggestion for how to make Nan’s work better in this recipe (I’m loyal to Grist & Toll!) – All best –
Stanley Ginsberg
December 31, 2017You need to use a finer, not coarser flour to get more lift. The coarser the flour, the denser the crumb.
FC Daisy
December 31, 2017This is also one of the first rye breads I made. I wanted a simple basic recipe that would represent well the essence of rye flour. I used home grown and home ground rye flour, a fairly coarse flour. It was a dense bread, but I could not believe how great it tasted, and how well it kept. Although we did eat it pretty fast. Good to know that finer grind gives a bigger rise. The only way I have to get a finer grind is to sift out the courser bran. I’ll have to try it next with sifted rye flour.
FC Daisy
December 31, 2017Every rye bread recipe I’ve tried from this blog and Stanley’s book have come out GREAT. It will take a good while to bake them all! Next up is the Normandy cider rye, as we also made our first batch of home-made hard cider this fall.
Owen Davis
January 29, 2018Is there any way to get rid of the second sponge and combine the sponge steps into one? What would change?
I am looking for a pared down recipe with a single sponge step and then final dough which I could use on a regular basis?
Thanks. Great blog and book.
Stanley Ginsberg
February 3, 2018Since the formula calls for 750g of sponge at Stage 2, you can shortcut the process by building the sponge with 355g each of flour and water and 40g of starter.
Owen
February 4, 2018Great. Thanks. Will report back after attempting.
Owen
Stefano Boseggia
April 6, 2018First time I make a rye bread. Usually I do wheat. Everything was going well but the dough came out too hydrated. I could’t shape it into two boules when I had to put it in the bannetons. I don’t understand what went wrong.
Stanley Ginsberg
May 8, 2018Rye is very different from wheat and the doughs can often be very slack, which is why many breads proof in bannetons. If you haven’t already done so, read my book The Rye Baker.
Sonia
July 29, 2019I just came across this recipe and am planning on trying it. I’m not particularly experienced making ryes so am wondering if the low salt is typical of rye breads. Since no one has addressed the question, I’m guessing it doesn’t affect the taste in this recipe, but I’m wondering why the amount isn’t closer to the typical 2%. Thank you for the very tempting recipe!
F.L.
July 5, 2020I am new to bread baking. I was so excited to bake this bread and it did turn out pretty good but not perfect. Both loaves were pretty flat, did not get much hight. Even during proofing, they were higher. The internal temperature registered 205F about 10 min before the time. I took the bread out, let it sit for 24 hours, and cut it. It looks to be a bit underbaked. Do you have any thoughts about it? Thanks for the recipe! Even as a new baker I felt it was well explained.
Stanley Ginsberg
July 14, 2020Rye is tricky. Overproof it and no amound of baking will prevent gumminess. If/when you try this one again, pay close attention to the fermentation.
FAINA
July 19, 2020I am definitely planning to make this bread again as it was the best so far from a few I tried and it is 100% rye. I am looking for a 100% rye easy bread that I can do routinely. Can you please clarify what exactly do you mean by ‘pay close attention to the fermentation’. It fermented great, not like wheat but no complaints. Also would you recommend to bake it as 1 big loaf, but possibly longer? I would like to try in the clay baker open top so it does not lose the shape as the form is small enough to keep the shape of the loaf
Rob
January 25, 2021Thank you for an amazing recipe. Who knew that such a simple method could yield something so simply delicious? I used stone ground rye from ny’s farmer ground flour — so the dough never quite got the smooth sheen your pictures show. I mixed it by hand — though a little sticky, it was nice to feel the airiness of the sponge. I did a 12 hour rye sour ferment, 1 3/4 hours for the second ferment, and a 2 hour final. Given the comments about over-proofing, I gave the loaves only a bit more than 15 minutes. I baked them on a baking pan liberally sprinkled with semolina. It took about an hour and 15 minutes total, with all the temperature step-downs you specify, before the thumps sounded just right.
After six hours, we sliced the first loaf. Totally worth the wait.